The Rules
-
Introduction
Open or CloseBackground
Twilight is a small scale skirmish game involving two or more forces battling for their own specific objectives within various scenarios. As you play the game you can see their stories unfold. You can choose to play scenarios that are essentially simple skirmishes or you can play more involved scenarios with specific objectives. To help you, this book includes a selection of scenarios you can try as well as a couple of narrative campaigns that involve a short series of scenarios that link together to tell a larger story.
The rules are designed to be quick and easy, but with the ability to make tactical decisions which will directly affect the outcome of the game.What you need to play
In order to play the game you will need a few critical items:
A scenario:
Every game of Twilight is set around a specific scenario with stated objectives, force numbers and deployment. There are a number of scenarios supplied in this book and many more scenarios can be found online. Once you have a feel for the game mechanics you could even create your own scenarios and share them with other players of Twilight.
”Chance Encounter” is an ideal introductory scenario that can also be used for larger games using whatever figures you have available.
Each scenario provides instructions on setting up the table and selecting and deploying your forces.Miniatures:
The scenarios will generally specify which models you need, but every model also has a points cost, so you can modify forces or even build your forces from scratch. There are a wide range of Twilight miniatures cast in metal or resin that you can choose from, or you can of course improvise.
Dice and Counters:
Nearly every wargame requires a good handful of dice and Twilight is no exception! For Twilight each player needs 12 Combat Stones (6 each of Erac and Oran) and one or more six sided dice. The players also need a set of Activation Counters.
The battlefield:
You will need to find a suitable area on which to play. Ideally this will be a carefully decorated wargaming table with ornate fubarnii dwellings or devanu encampments, but failing that, any reasonably large playing surface will do. Most games work best on a table at least 3’ by 3’, but you can play small scenarios on a smaller table.
-
The Forces
Open or CloseIntroduction
Each player’s force is made up of a number of individual characters or creatures. For the Empire this might be a unit or two of militia or knights lead by brave captains, while for the devanu this is likely to involve just a handful of well trained devanu warriors and beasts.
Each individual is represented by a model, a set of stats and a number of Abilities.Model Stats
Every model has a profile that describes how they are played in the game.
Model Descriptors:
A model will have one or more Descriptors, such as ”Troop”, ”Elite”, ”Beast” or ”Civilian”. These Descriptors have no specific rules, but will determine what Leadership or other abilities will affect them and may influence some scenarios.
Points Cost:
This stat shows how many points the model costs to include in your force.
Movement:
This is the distance in inches that a model can move across open terrain as part of its Activation.
Combat:
This stat shows how many Combat Stones the model uses in combat if it is a Primary Combatant.
Support:
This stat shows how many additional stones the model gives if it is supporting in combat.
Toughness:
If a model is hit by a blow during combat then it is forced to make a Toughness save and must roll equal to or higher than its Toughness stat on a D6 or be removed as a casualty.
Stamina:
This stat shows how many points of Stamina the model has.
Command:
This stat is the range in inches over which a model can use Leadership Abilities.
Size:
All models have a specified size, ranging from tiny little Critters up to huge lumbering beasts such as the Wild Belan. A model’s size determines how large its base is and can have other impacts during the game:
• Tiny: 15mm
• Small: 30mm
• Medium: 40mm
• Large: 50mm
• Huge: 60mm
Tiny and Huge models have some special rules, as described below.Tiny Models:
Tiny models represent creatures that are so small that they are little more than a distraction.
• Small models may disengage from Tiny models freely, without Moving Cautiously. They may move through Enemy Tiny models if they Move Cautiously.
• Medium sized or larger models may disengage from or move through or onto Enemy Tiny models freely.
• If a Medium or larger model wishes to step on one or more Tiny models then the Tiny models are displaced. After the model has moved, the Tiny models’ owners place them so that they are adjacent to the displacing model. The player with the Initiative moves his Tiny models first.
• Tiny models never trigger abilities such as Defender[S] or Momentum[S].Huge Models:
Huge models tower over smaller models and dominate the tabletop.
• Huge models may treat Small models as being Tiny models, disengaging from them freely, Moving Cautiously through them or even displacing those that get in their way.Abilities
Most models in the game have a number of abilities, which are shown on the model’s profile and describe special actions that a model can perform. Unless specified, abilities can be used several times each Turn. Some abilities require the use of Stamina, and these are marked in their description with an asterisk.
All abilities fall into one of six categories, which roughly determines when in the game they can be used.Leadership [L]:
Allows a model to activate a certain number of other models within their Command Range in inches. A model may only use one Leadership Ability per Turn.
Activation [A]:
Used during a model’s Activation to allow it to carry out special actions, such as fighting a combat or additional movement.
Combat [C]:
Used during Combat Phases to alter the flow of the combat.
Ranged [R]:
These abilities completely replace a model’s Basic Movement during its Activation and allow it to make a Ranged Attack.
Traits [T]:
These abilities describe traits of the model that are automatically in effect.
Special [S]:
These are special actions that can be used outside the model’s Activation, usually in response to another model’s action.
Stamina
Some models have a Stamina stat, which shows how many Stamina points it has. Stamina are represented using small stones or dice, which are placed next to the model on the table. A model may choose to spend points of Stamina during combat, with each Stamina allowing the model to recast a single Combat Stone. Stamina can also be spent to use specific abilities available to the model. Abilities that require Stamina are marked with one or more asterisks.
Regaining Stamina:
One point of Stamina is replenished during the End Phase of each Turn. Some abilities also allow models to Replenish or Gain Stamina at other times. A model may only replenish Stamina up to its Stamina stat. Any model may gain Stamina, even if it does not have a Stamina stat or if it takes it beyond its usual limit. However, a model may only ever have a maximum of one Stamina more than its Stamina stat.
-
The Field of Battle
Open or CloseIntroduction
Games of Twilight take place on small battlefields across the continent of Anyaral, be that the lush green forests and plains of the Central Empire, the cold snowy Setir Mountains, the unforgiving Argoran Wastes or even the streets of Gar Loren. When you set up your battlefield you can choose what sort of land you are playing on and use suitable terrain. You should ensure that all players know what effect the different types of terrain will have on the game.
Terrain types
Difficult terrain:
You should use Templates to clearly show the boundaries of areas of difficult terrain such as marshes, snow drifts or patches of shallow water. models must Move Cautiously if they wish to cross any part of the Template during their movement.
Woods:
Woods are a special type of difficult terrain. In addition to the rules for difficult terrain the following also applies:
• You may not draw a Line of Sight through more than 2“ of a wood Template.
• If any part of a model’s base is within a wood Template then it counts as being within the Template and is Obstructed if targeted by a Ranged Attack.Snow drifts:
Snowdrifts are a special type of difficult terrain. In addition to the rules for difficult terrain the following also applies:
• If a model’s base is completely within a snow drift Template then it is Concealed[T] if targeted by a Ranged Attack.Shallow water:
Areas of shallow water are difficult terrain that do not obstruct Line of Sight and do not offer cover. models without Flying[T] and/or Swim[A] Move Cautiously, and cast one less stone in combat.
Deep water:
Areas of deep water are inaccessible to most models unless you use boats or amphibious models in a specific scenario, or you have the Flying[T] and/or Swim[A] abilities. They do not offer cover.
Obstacles
Obstacles can vary in size from small boulders to large buildings. These may completely block Line of Sight, or simply cause an obstruction to Ranged Attacks. models can cross over objects that are shorter than they are by Moving Cautiously. If there are ladders over taller objects then they may be climbed by Moving Cautiously over them.
Linear barriers:
Low walls or fences are a common sight across Anyaral. A model may cross a barrier while Moving Cautiously. If there is an Enemy model on the other side then that model’s owner must choose to either move it back to allow space for the model that is crossing or move to stand directly in its way. If it moves to block the crossing then the two models count as Engaged and can fight during ensuing Combat Phases. If they fight then they may each cast an additional Oran Combat Stone.
-
Playing The Game
Open or CloseIntroduction
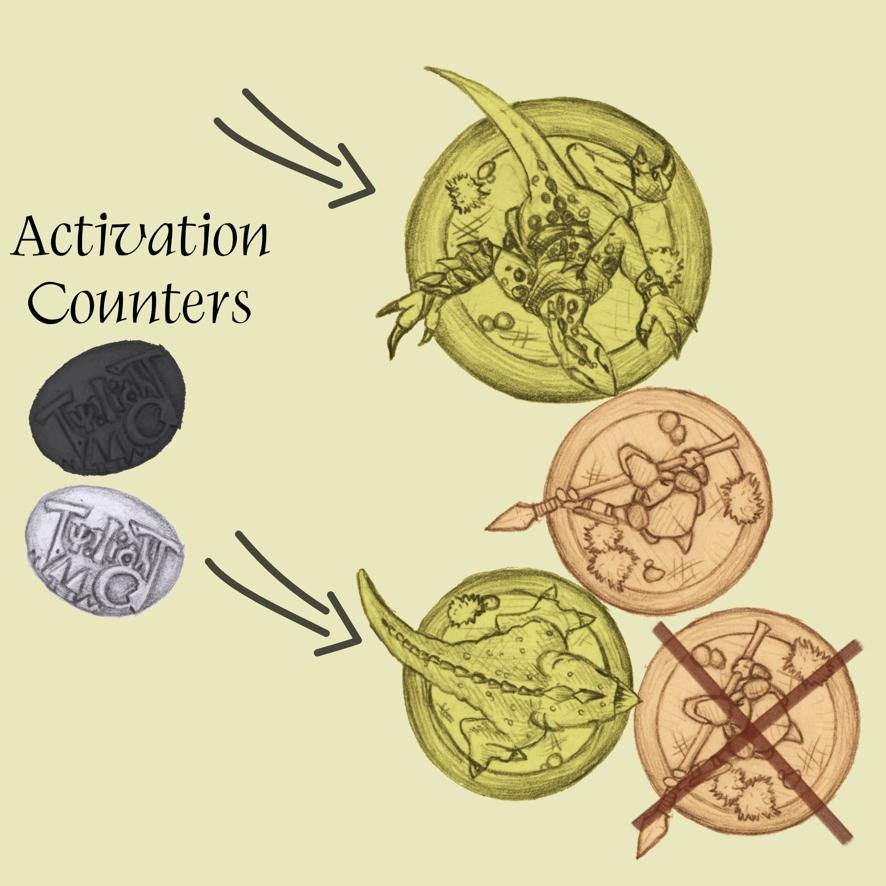
Having chosen a scenario and deployed your forces it is time for the game to begin! Unlike many other games, Twilight does not follow a fixed Turn order with one player having a Turn to move all their models then the other player having a Turn. Instead, Twilight uses the Activation Counters to determine the order in which individual models are activated and when they get to fight.
Dice and Counters
Combat Stones:
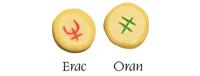
Twilight uses special Combat Stones (CS) for determining the results of combats. These stones have two sides, one marked with a symbol and the other blank. There are two types of Combat Stone: Erac (offensive) and Oran (defensive).
Activation Counters:
These Counters are used to determine the order in which units activate, and when combat is resolved. For a two player game there are 14 Counters: six coloured Initiative Counters for each player, as well as two differently coloured (typically orange) Combat Counters. If there are more than two players then you just add a set of six Initiative Counters for each additional player. All the Activation Counters are placed in a bag at the start of the game.
Dice:
Twilight requires a small number of six sided dice (D6) for making Toughness saves and for some other game effects.
Turn order
A single Turn consists of a series of Counters being drawn from a bag. Depending on what Counters are drawn, both players may get to activate their troops and there will be two phases when combats are fought.
• The first thing to do is draw one Activation Counter from the bag.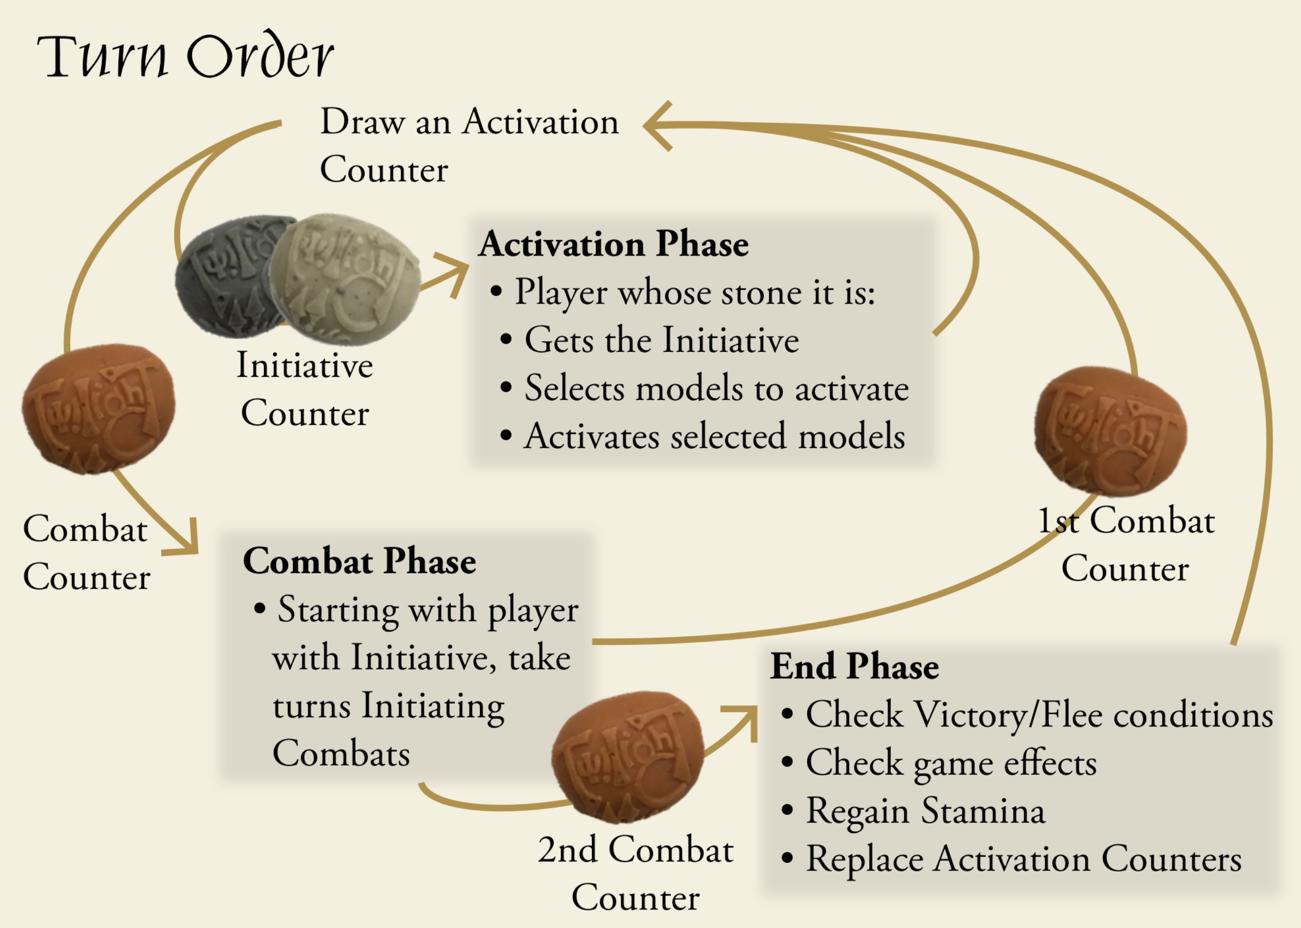
Activation Phase
If the Counter that was drawn was one of the players’ Initiative Counters then that player will gain the Initiative and also have the opportunity to activate and move models as part of an Activation Phase. Each model may only activate once per Turn and it is possible that some models may not get to activate every Turn, so the players must choose carefully how they use each of their Activation Phases.
Combat Phase
If the Counter is a Combat Counter then starting with the player who has the Initiative each player will have the opportunity to initiate and resolve combats as part of a Combat Phase. After each phase is concluded, a further Counter is drawn. This continues until both Combat Counters have been drawn, at which point the Turn concludes with the End Phase.
End Phase
During the End Phase both players check to see if they flee or if they have achieved their victory conditions. All models with Stamina may then regain up to one point of Stamina and all the Activation Counters go back in the bag.
-
Activation Phase
Open or CloseIntroduction
When a players’ Initiative Counter is drawn they gain the Initiative and have the opportunity to select one or more of their models to activate. They will then activate each of the selected models in turn. This is an Activation Phase.
Gaining the Initiative
When a player’s Counter is drawn, that player has the Initiative. It is best to leave the Activation Counters in a row by the table so you can see which player has the Initiative and how many Initiative Counters each player has drawn so far this Turn.
• The player may select a single model from his force for Activation. This model must not have previously activated in this Turn and is counted as having been Activated Directly. If that model has any suitable Leadership Abilities then further models may be selected for Activation. Those models may in turn use Leadership Abilities if they have them.
• Each model can only use one Leadership Ability per Turn and each model can only be selected for Activation once per Turn. The player with the Initiative will get to select which models fight first during the Combat Phase and may also have additional influence in some scenarios.Selecting models
• The player with the Initiative may now select models to activate.
• If the player does not wish to activate any models, then they skip their Activation and draw another Counter.The chain of command
• The chain of command is an important aspect of Twilight. Each Turn a player only has a limited number of Activations, and it is important that they make the most of each of them. Some models represent leaders who can select further models to activate during their Activation Phase. These leaders have special skills such as Captain[L] or Commander[L].
• Additional models that are selected in this manner can then go on to select further models to activate if they have the relevant Abilities.
• A well constructed military force can activate very efficiently without needing many Activation Phases. A poorly constructed, or weakened force will however struggle to move coherently.Example:
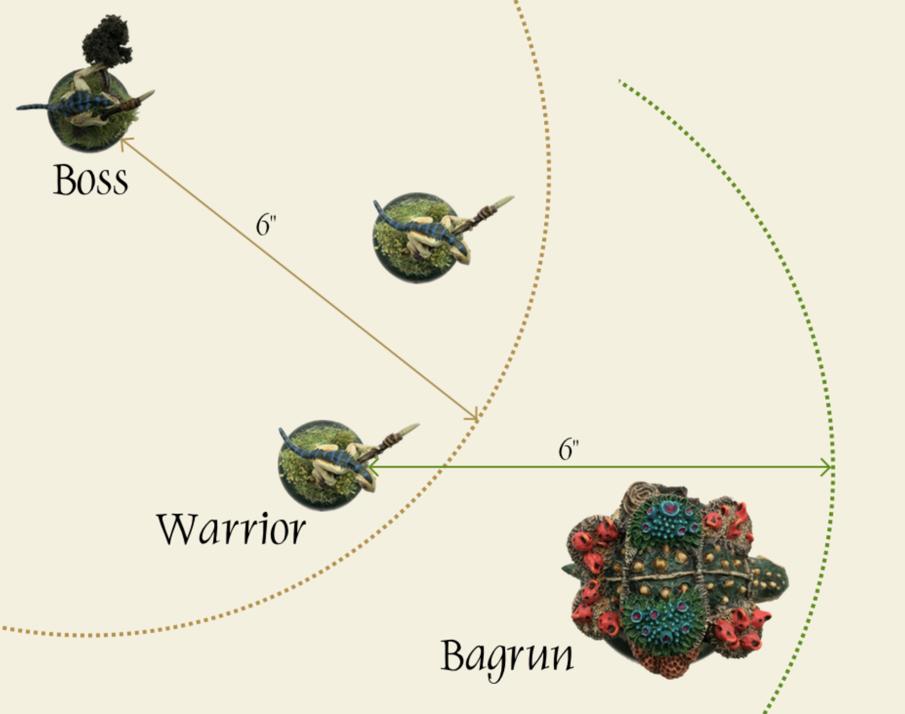
The Kedashi player wishes to activate all his models. He selects the Trebarnii Boss first. He then uses the model’s Captain[L] ability to select the two Trebarnii Warriors who are within his Command Range of 6 inches. He can then select one of two warriors to activate the Bagrun Bomb Carrier using the warrior’s Beast Handler[L] ability, even though the Bagrun Bomb Carrier is outside the control area of the boss. The player can now activate all the selected models in any order.
Activating models
• Once the models have been selected, the player activates each of those models in turn, with each model completing its Activation before the next model is activated.
• When a model is activated it normally gets to carry out a Basic Movement, but may also have the option to instead fire a ranged weapon using a Ranged Ability. It can also use any Activation Abilities that it has available to it. Both Ranged Abilities and Activation Abilities are detailed in each model’s profile.Using abilities:
Some abilities can only be used immediately after completing a Basic Movement. This means they cannot be used if a Ranged Ability is used instead of moving. They also cannot be used if another Activation Ability is used after the Basic Movement. For example, it is not possible to use both Transport[A] and Charge[A] one after the other.
Movement:
• Under normal circumstances when a model moves it may move up to its speed in inches, but may not disengage from Enemy models, move over obstacles or move across difficult terrain, such as marshes or woods, unless it chooses to Move Cautiously.
• During its movement, a model may move through Friendly or Allied models, but not Enemy models. The model may change its facing at any time during its movement.Moving Cautiously:
• Before moving, a model may choose to Move Cautiously for the entire movement. The model may then only move up to half its speed in inches, but it may disengage from combat or cross difficult terrain. It may also move over obstacles such as low walls or fences. If a model wishes to disengage and move through difficult terrain then it does not suffer any additional penalty.
• Some models have Activation Abilities such as Sprint[A] that allow them to make additional moves. A model can choose separately whether to Move Cautiously for each of these movements. -
Ranged Combat
Open or CloseIntroduction
• Ranged Attacks are made during a model’s Activation if it chooses to use a Ranged Ability. The ability will give the details of the Ranged Attack as well as stating how far the model can move before attacking and if there are any relevant abilities.
• Unless stated otherwise, a model may not use a Ranged Ability or make a Ranged Attack if it is Engaged.Initiating combats
When making a Ranged Attack you select a target that is within Line of Sight of the Attacker and within range of the attack. A ranged combat is then fought between the Attacker and the target in the same manner as melee combats. Neither side may benefit from Support during a ranged combat.
Resolving combats
Having determined which model is being targeted and whether it is within range and Line of Sight, the Attacker and target select and cast a number of Combat Stones to determine if the Attacker has managed to hit his target.
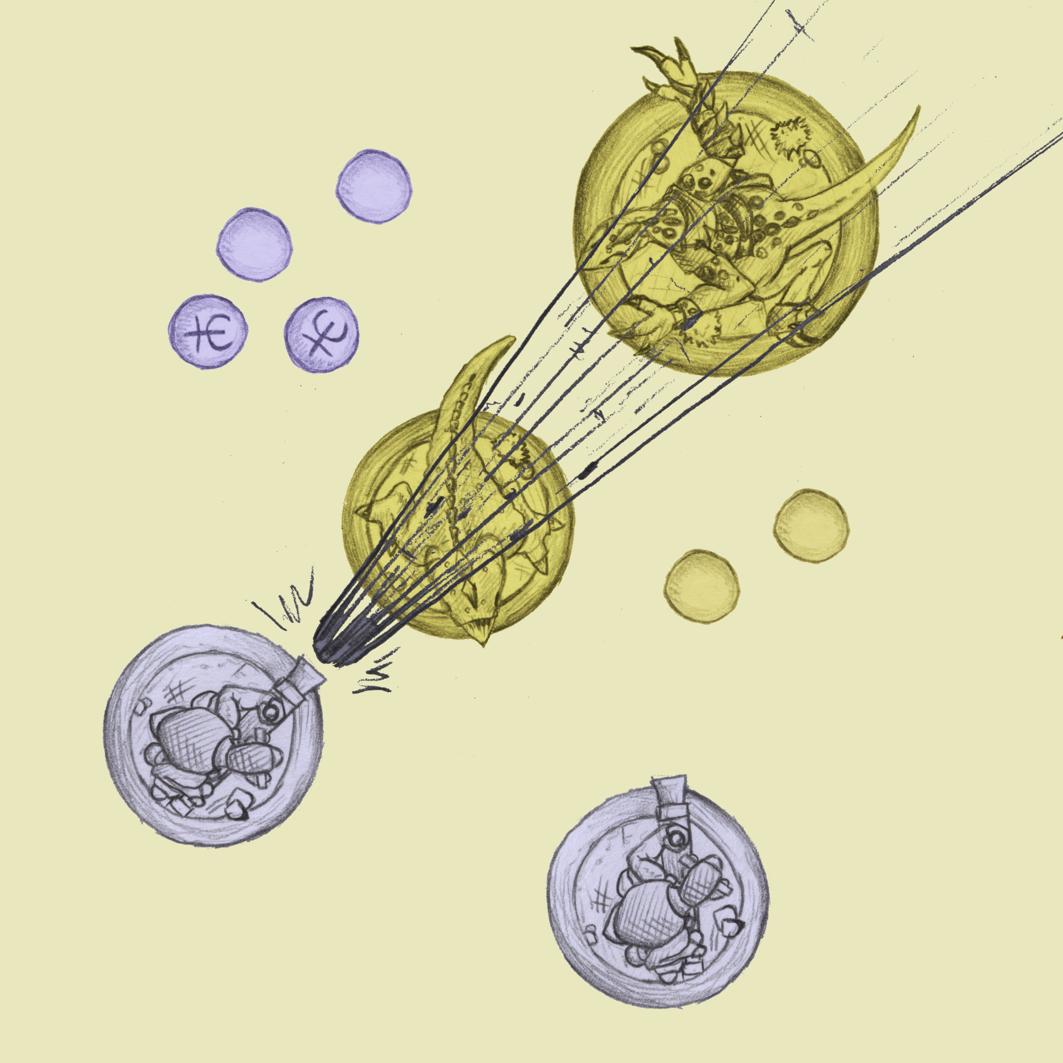
Casting the stones
• Each player counts up the number of Combat Stones they need to cast.
• The Ranged Ability specifies how many Erac stones are cast for the attack. The Defender always casts two Oran stones, plus an additional stone if they are Obstructed. Certain abilities (such as Agility[T]) may allow the target to cast more stones in defence.
• Both players cast their Combat Stones at the same time.Adjusting the results
Each face-up Erac the Attacker casts is a successful blow, unless it can be countered by an opposing Oran. Both players now have the opportunity to use Stamina or abilities to adjust the results. The Attacker may only use abilities specific to Ranged Attacks, but the Defender may use any of their Combat Abilities. Starting with the Attacker, each player can choose to either use a Stamina to recast a stone, or an ability, or to pass. This process continues until both players choose to pass sequentially.
Allocating blows
The Attacker now works out how many successful unopposed Erac they have cast, which indicates how many blows they have landed on their target. If any blows have been landed the Defender must make a Toughness save against it. This is made using a D6, and the blow is survived if the roll equals or exceeds the model’s Toughness value. This roll may be impacted by abilities specific to the Ranged Ability such as Powerful[C]. If the roll is failed then the model is removed from play as a casualty.
Definitions
Line of Sight:
A model has Line of Sight to another model if a line can be drawn from the model’s head to any part of the other model, including its base, without passing over the base of any other models or passing through any obstructing terrain.
Obstructed:
If a model is within Line of Sight, but there are other models or scenery that obstruct visibility of any part of the model or its base then it is Obstructed.
Engaged:
If the target is Engaged with an Enemy model then it always counts as Obstructed, even if the Enemy model is in front. In addition, if the Attacker and Defender cast the same number of successful stones, then it is possible that the engaging model has been hit. Fight an additional combat against the engaging model. If there are several engaging models then randomise which model may get hit before resolving the combat.
Blast Attacks:
• Some Ranged Abilities allow a model to make Blast Attacks. These use a Blast Template to determine what targets are attacked. Place the Template so that the narrow end touches the Attacker’s base. All models under the Template become potential targets. Fight the combats using the rules above in an order chosen by the Attacker.
• If a target is touched by both long edges of the Template then it is considered to be caught Full Blast and may suffer additional effects.Combat example: Blast Attacks
An animation of this example is available to watch on YouTube.
• A Delgon KalDru wishes to fire his Light Derak at a Grishak and a Devanu Kopa. The Grishak has advanced close to the KalDru, having previously charged, but failed to kill the KalDru’s companion.
• Both KalDru are activated by a nearby priest. The first is Engaged, so cannot fire. He can however still activate and disengage, leaving a potential shot for the other KalDru.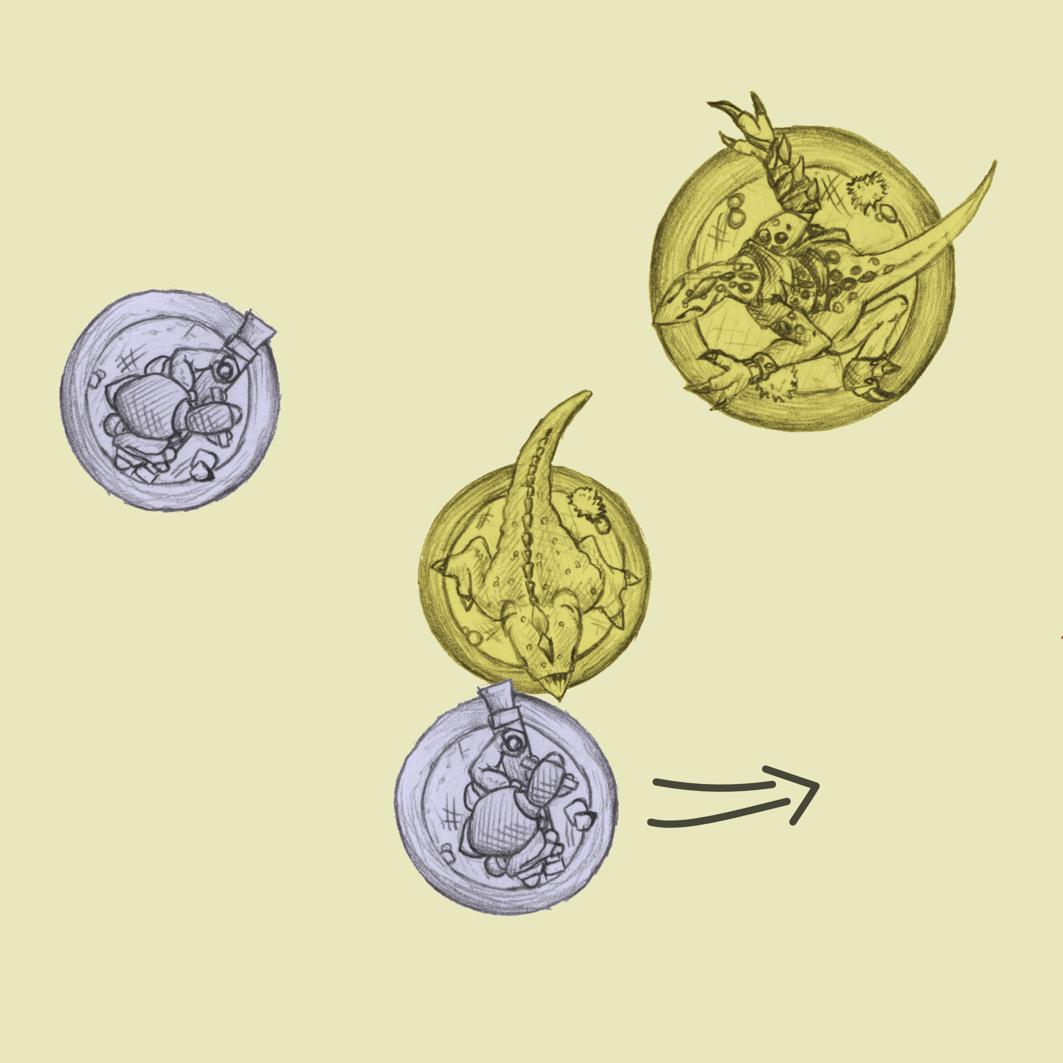
• The second KalDru moves a short distance to get a better shot. If the Grishak is killed then he will also have Line of Sight to the devanu behind it.
• The Light Derak would normally give a three stone attack, but the Attacker casts an additional stone as the Grishak is caught Full Blast. The Grishak casts two stones in defence.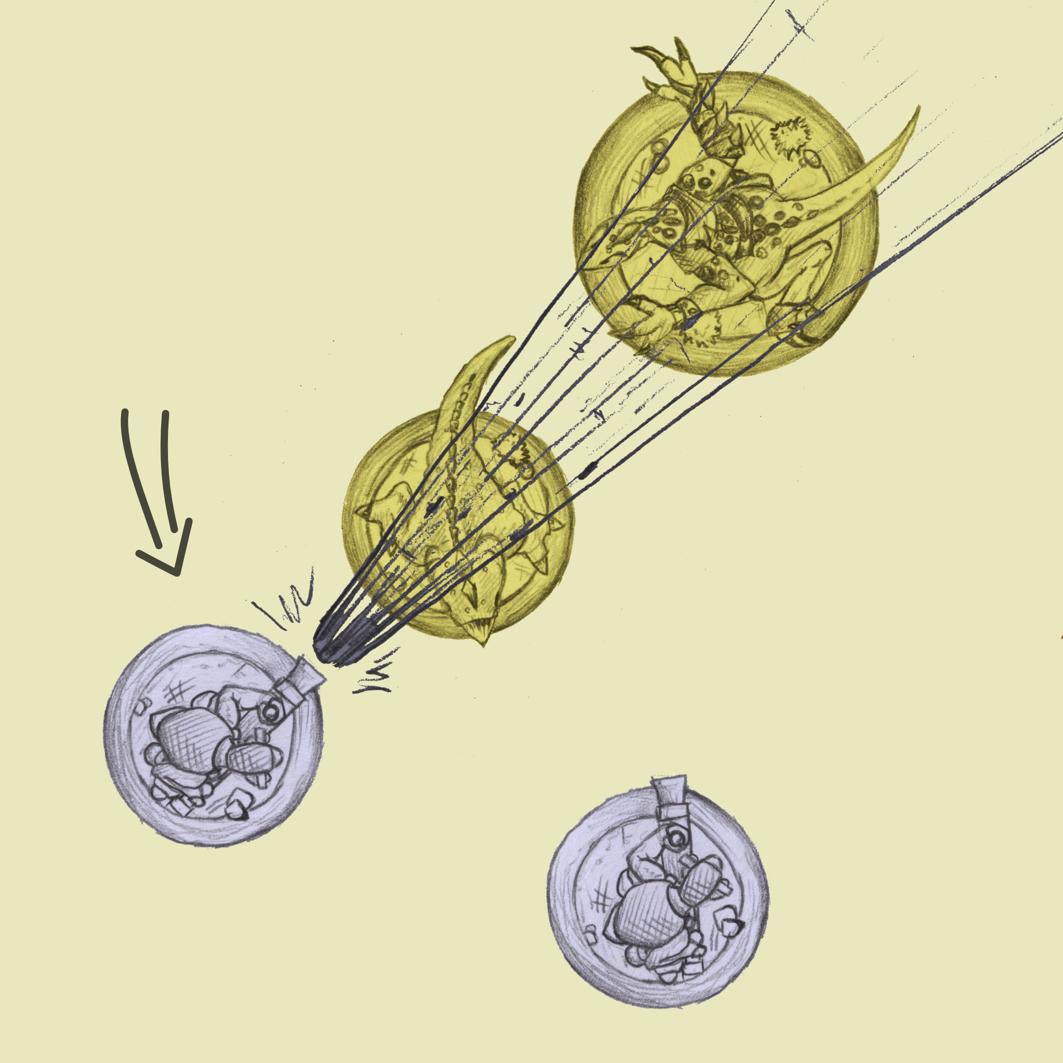
• The Delgon player casts two successes while the Devanu player is less fortunate and fails to get any successes. As neither side have any relevant abilities, the Grishak tries to make his two Toughness saves, but fails and is removed, leaving a clear Line of Sight to the devanu.
• The Delgon player then chooses his next target as the Devanu Kopa as it is the only other model under the Template. This time he only casts three stones as only the first target for the attack can be caught Full Blast.
• The devanu would normally cast two stones, but he can cast an additional stone due to Surefooted[T]. The Delgon player is lucky and casts three successes, while the Devanu player only casts two, leaving one potential blow. The devanu then expends one Stamina to deftly Dodge[C] the attack.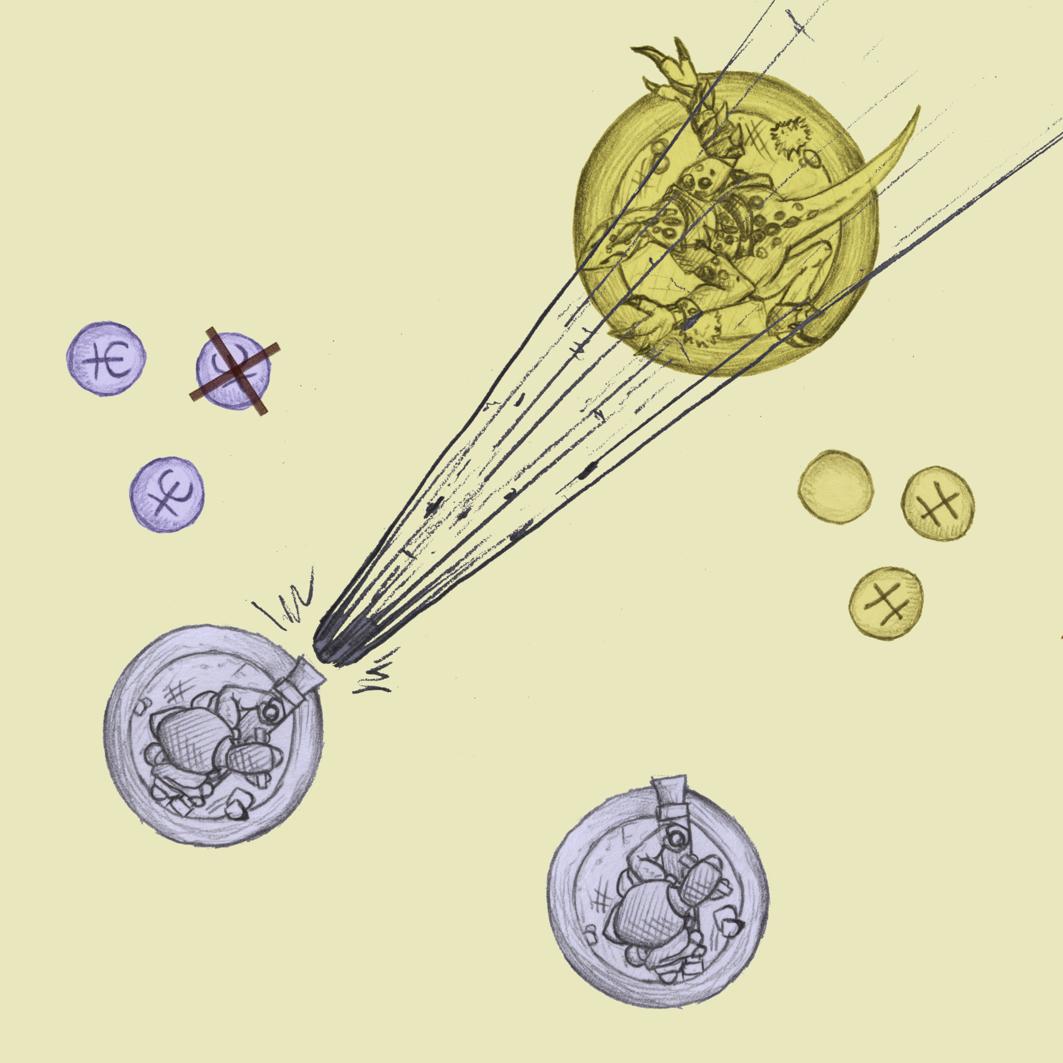
-
Combat Phase
Open or CloseAdjacent and Engaged models
• A model is Adjacent to another model if the two models’ bases are directly in contact. Some skills provide a benefit to adjacent models.
• If a model is adjacent to one or more Enemy models then it is Engaged, and can be involved in combats during the Combat Phase.Initiating combats
• When a Combat Counter is drawn players take turns in Initiative order (see FAQ) to select models to take Combat Actions and fight out the ensuing combats.
• During a Combat Phase every model that is Engaged by or engaging an Enemy model has the potential to have a Combat Action. Most models may use that action to Initiate a combat with an adjacent model. However, if a model Supports another combat or is attacked before they use their Combat Action, then they lose it for the rest of the Combat Phase. A Combat Phase continues until all players choose to pass or have run out of models.
• Melee combats can also be initiated as part of a model’s Activation if it has a suitable Activation Ability (such as Assassinate[A], Charge[A] or Coordinated Strike[A]).
• In all combats, the model who initiated the combat is the Attacker and the other model is the Defender. These are the Primary Combatants.
• During a melee combat, starting with the attacking player, each player has the opportunity to nominate one or more of their models to Support the combat. The supporting model must be Engaged with an Enemy model already involved in the combat. Players take turns either adding more supporting models to the combat or passing until both players have passed sequentially. Each player may have any number of supporting models.Supporting models
During a Combat Phase each model may only Support in a combat if it hasn’t already been involved in a combat this Combat Phase (attacking, defending or supporting). If a model Supports a combat then it loses its Combat Action for the rest of the Combat Phase.
Resolving combats
Having selected all the models to be involved in the combat the players select and cast a number of Combat Stones to determine if either side lands any blows.
Casting the stones
• The number of Combat Stones each player casts is determined by using the Combat Value of their Primary Combatant, together with any additional Combat Stones equal to the Support Value of each of their respective supporting models. Some Combat Abilities may be used at this point, but only from those available to the Primary Combatants. These abilities must be declared before the Combat Stones are cast.
• The players secretly select the Combat Stones from their Pool Of Stones, depending on their tactic for the combat. More Erac leads to a more aggressive attack while more Oran leads to a defensive approach. You can only draw from your own pool of twelve stones, which means you can never select more than six of either Erac or Oran.
• Both players then cast their Combat Stones at the same time.Adjusting the results
• Each face-up Erac is a successful blow, unless it can be countered by an opposing Oran. Each player counts up the number of successful Erac they cast, and subtracts the number of successful Orans their opponent cast. If this number is greater than zero then it is the number of blows that they may have landed. Both players now have the opportunity to use Combat Abilities to adjust the results.
• Starting with the player who initiated the combat, each player can choose to either use a Combat Ability of their Primary Combatant, or to pass. Supporting models may not use any of their abilities. The abilities may require specific Combat Stones to be recast or turned over by either player, and may cost Stamina to use. This process continues until both players choose to pass.Allocating blows
• Each player now works out how many successful unopposed Erac they have cast, which indicates how many blows have landed. The first blow must be allocated to the Primary Combatant, but any remaining blows may be allocated to any Enemy models involved in the combat. models can be hit by several blows during the same combat.
• Once all blows have been allocated by both players, each model struck by a blow must make a Toughness save against it. This is made using a D6, and the blow is survived if the roll equals or exceeds the model’s Toughness value. This roll may be impacted by Combat Abilities such as Powerful[C]. If the roll is failed then the model is removed from play as a casualty.Combat example: selecting combatants
An animation of this example is available to watch on YouTube.
• So far this Turn both the Fubarnii (black) and Devanu (white) players have drawn an Initiative Counter. The Fubarnii player chose not to move anything, but the Devanu player used his Devanu Sempa to activate the Grishak using Beast Handler[L] and they both moved into contact with the fubarnii Militia. The Grishak Charged in and fought a combat with a hapless member of Militia, whose armour was insufficient to save him from the Savage[C] attack and was therefore removed from play.
• When the next black Counter was drawn the Fubarnii player moved a Knight in to Support the remaining overwhelmed Militia.
• An orange Combat Counter was then drawn, leading to a Combat Phase. The Fubarnii player has the Initiative, so has the first opportunity to initiate a combat.
• The Fubarnii player chooses to attack the Devanu Sempa with the Knight. The Devanu player has the opportunity to choose a model to Support, but there are no models Engaged with the combat at this time so he is forced to pass.
• The Fubarnii player chooses to use a militia in Support. As the Grishak is now Engaged with the rapidly growing combat, the Devanu player chooses to involve it in the combat to give Support.
• The Fubarnii player will get to cast 4 Combat Stones, while the Devanu will cast 6.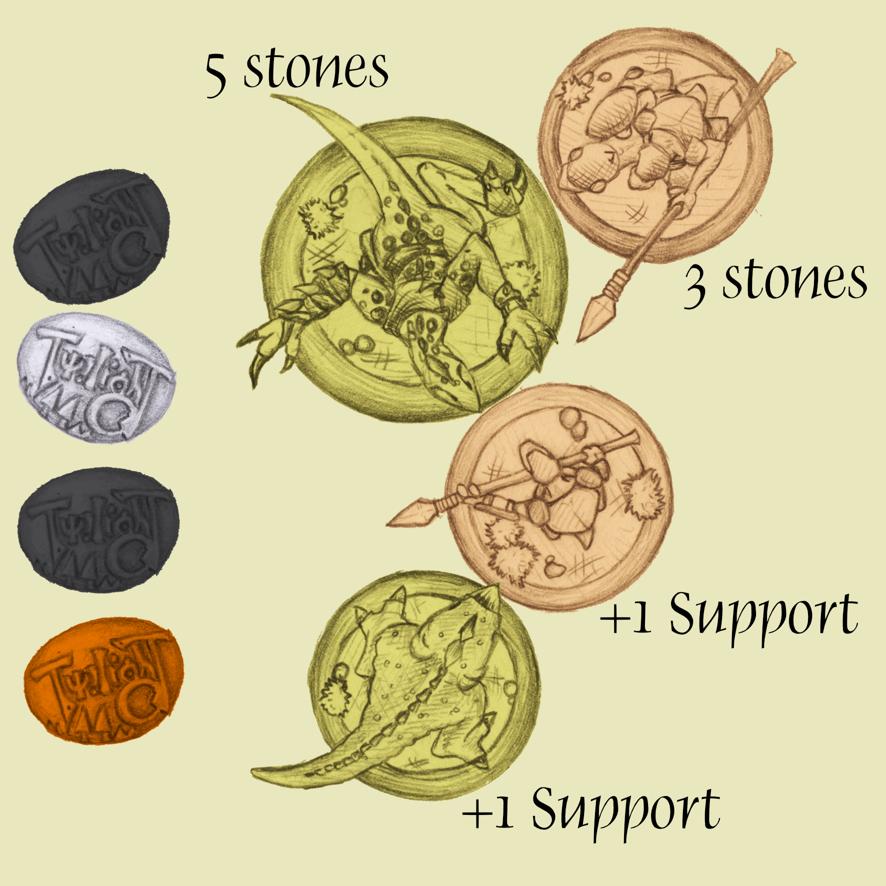
Combat example: resolving the combat
• Once the two players have selected their Primary Combatants and supporting models, both sides select a mix of Erac and Oran in secret from their Pool Of Stones.
• The Fubarnii player has 4 stones, 3 from the Knight and 1 from the supporting Militia.
• The Devanu player has 6 stones to choose, 5 from his Devanu Sempa, and 1 from the supporting Grishak.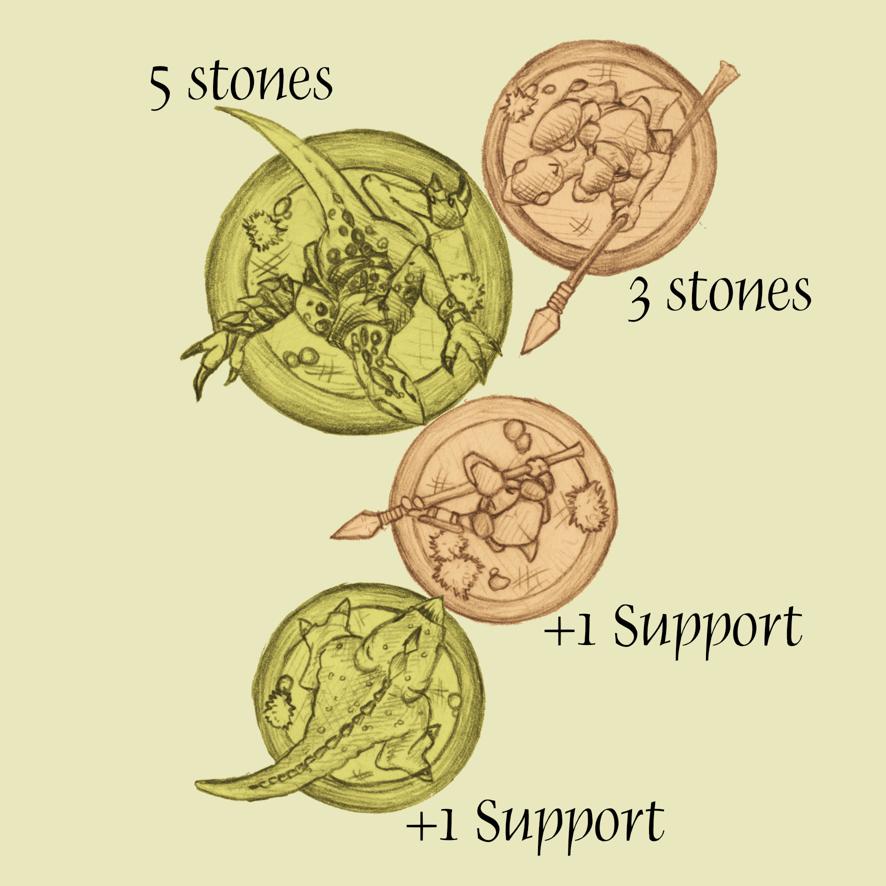
• The Fubarnii player is keen to take the devanu down, whatever the cost. He selects to take all 4 stones as Erac. The Devanu player is more cautious, selecting 4 Oran and only 2 Erac.
• Both players cast their Combat Stones at the same time.
• With the resultant casts, both sides would land a blow against the other, and both the Devanu Sempa and the Knight would need to make a Toughness save.
• The Fubarnii player gets the first opportunity to adjust the result as he initiated the combat, but is happy with his cast as he has managed to land a blow on the Devanu Sempa.
• The Devanu player is less happy with the result, so uses one of his two remaining Stamina to use Combat Discipline[C] to recast his four failures, this time casting more successfully and avoiding any blows from landing.
• The Fubarnii player responds by using Combat Trained[C] to recast his two failures, casting another successful Erac.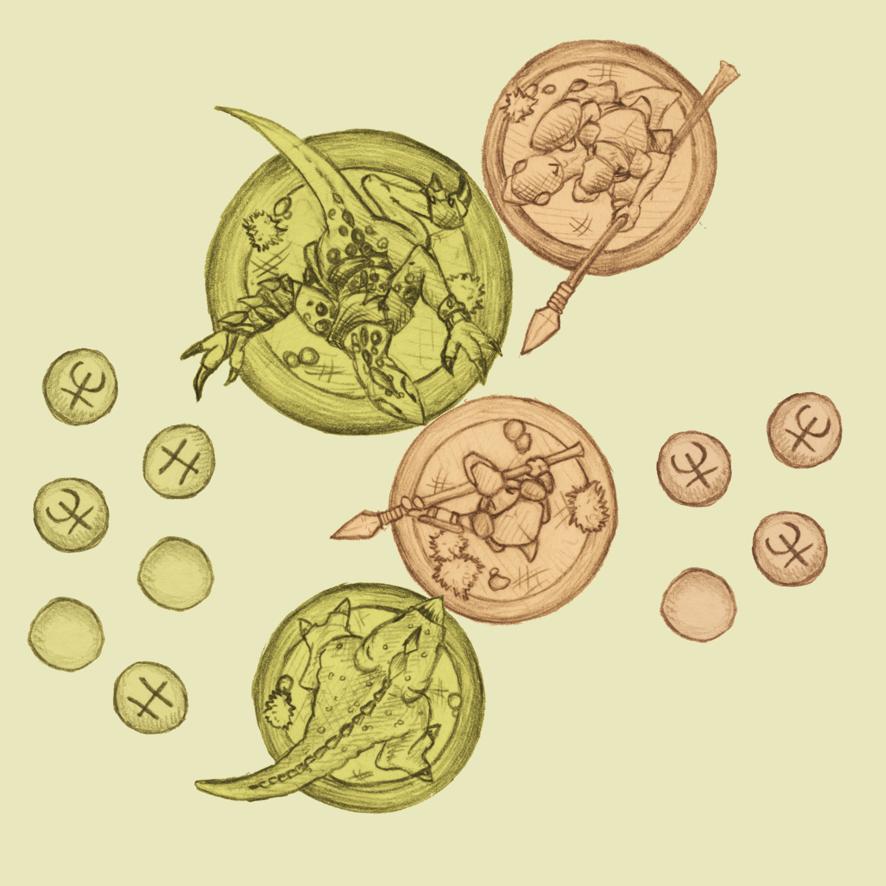
• The Devanu player decides to use his last Stamina to Dodge[C], turning over one of the Fubarnii player’s Erac, and removing the only blow that was going to land.
• The Fubarnii player has no options available to him, so passes. As does the Devanu player.
• The Devanu Sempa has landed two blows, and allocates one against each of the fubarnii. Both are unfortunate enough to fail their Toughness saves, and are removed from play as casualties.
-
End Phase
Open or CloseThe steps
The End Phase takes place immediately after the end of the second Combat Phase of the Turn.
During the End Phase:
• Both players check whether they have won or if their force flees, based on the rules for the scenario.
• Check if any effects take place during the End Phase, such as rolling to see if Cloud effects dissipate.
• Every model with less than their maximum number of Stamina regenerates one point of Stamina.
• All the Activation Counters are returned to the bag.
• Once the End Phase is completed another Turn is started by drawing another Activation Counter. -
Advanced Rules
Open or CloseBuilding forces
A number of scenarios include recommended forces, but every model has a points value so you can choose to increase the force sizes, swap individual models out, or even build a new force of different models up to an agreed points limit.
When building a force you must be careful to build a force that is going to function well:
• You may only select models from force lists from one of the main cultures, either the Empire, Casanii, Delgon, Devanu, or Kedashi. The Dhogu are a special case and can either be used as a stand-alone force or as Allies in a Delgon force.
• You must include at least one Elite model in your force.
• It is best to try and build a force that has enough models with Leadership Abilities to allow you to activate all the different models with no more than 4 Activation Counters. For smaller forces you will just need a couple of priests or captains, but for larger games you may need to include a commander or two if you want to be able to coordinate larger manoeuvres.Themed forces
Most cultures have various subcultures within them and these are represented by Themed forces. This is particularly apparent for the The Fubarnii Empire as it is made up of lots of different clans, which may sometimes work together. When constructing a force you should try to choose models from only one or two different themes as they won’t always collaborate in an efficient manner! Models from different themes can be used in the same force, but are considered to be Allies. The basic models from each of the Cultures, including the empire militia and most of the units from the Delgon and Devanu forces, are classed as being ″Core lists″ and these can be declared at the start of the game as being part of any theme.
Friends and Allies
• During most battles it is very obvious which models are your Friends and which are your Enemies, but when Allies are involved things can be slightly less straightforward!
• All models from the same Culture and Theme that are on the same side are considered to be Friendly to each other.
• If you wish to use multiple themes from the same culture within the same army then at the start of the game you specify which models fall into each of a number of different forces. models from different forces are considered to be Allied rather than Friendly models. Abilities like ″Captain[L]″ cannot be used on Allied models, but ″Commander[L]″ is more flexible.
• The Dhogu can be used as an Allied force with the Casanii (or even the Empire forces on some occasions).A table detailing these relationships can be downloaded on the Anyaral Toolbox.
Multiplayer games
• Most games of Twilight involve two players, but it is possible to play with more. The simplest way is to play with two teams of players, with each team sharing the models and Initiative Counters for one of the forces. This type of multiplayer game doesn’t require any special rules although you will have to discuss with your Ally who gets to use each Initiative Counter!
• Alternatively you can each take control of your own force, with some of the players acting as Allies or all fighting independently. In these larger multiplayer games every player needs their own set of six Initiative Counters, which are placed in a bag with two Combat Counters as with a normal game. Several of the scenarios in this book include rules for these multiplayer games.
• At the start of the game you can decide that some of the forces are Allied, which may allow them to use the Commander[L] ability on some of the Allied force’s troops. The Allied forces do not however count as being Friendly models.
• It is harder to keep track of Initiative order for these larger games and it is occasionally important. Each player needs an additional Counter to track Initiative and these are all placed separately on a short track to the side of the table. Each time a player’s Initiative Counter is drawn they move their Counter to the front of the track, shifting the other players’ Counters back. This gives an ongoing measure of which players have the highest Initiative at any time.
• If there are large combats involving models from more than two players then every player will get the opportunity to provide Support to either the Attacker or the Defender. As usual, the attacking player will go first, then you continue through the other players in Initiative order and repeat until all players pass sequentially. However, only the attacking or defending model will be able to use their Combat Abilities to adjust the result. The attacking and defending players can allocate any excess blows as usual and can choose any of the supporting models.Riverfolk
If you are using a Riverfolk force then during game set-up you may (with your opponent’s agreement) deploy a river across the table, along with a boat. Your opponent may adjust things by moving the river and the boat up to 6 inches each. This should be done before either player deploys their models and either player may deploy on, move onto or drive the boat during the game. There are certain scenarios where this wouldn’t be sensible, or it would imbalance things so discuss with your opponent first!
-
Other Game Effects
Open or CloseCloud Templates
Some models in Twilight, such as the Delgon KalGush, can generate Clouds to either hide their movement or disorient their opponents. These effects are represented on the table by a Cloud Template of a specified diameter.
• You may not draw a Line of Sight through more than 2 inches of a Cloud Template.
• If any part of a model’s base is within a Cloud Template then it counts as being within the Template and is Obstructed if targeted by a Ranged Attack and may suffer further effects.
• During the End Phase of each Turn, before Stamina is replenished, roll one die for each Cloud Template on the table. The Cloud effect is removed on a roll of 4+.Entangled
If a model has one or more Entangled Counters then it may be Entangled. A Large model may ignore one Entangled Counter when determining if they are Entangled and a Huge model may ignore up to two.
A model may not have more than four Entangled Counters.
Entangled models do not get a Combat Action and cast one less Combat Stone if attacked in combat, or if targeted by a Ranged Attack.
An Entangled model may not activate normally, but may use its Activation to try to free itself by fighting a combat against the Entangled Counters. The Counters cast no Combat Stones, but each has a 5+ Toughness save. Adjacent models may support on either side of the combat.Objects
Some units or items for scenarios are classified as Objects, such as Loot Tokens or Devanu Eggstick.
• Some Objects are simple Counters, while others are treated in the same manner as standard units in the game and can be attacked. In both cases they never count as engaging other models, but they can be Engaged.
• An Object can be picked up by an adjacent model as part of that model’s Activation. Remove the Object from the table and mark which model is carrying it. A model may drop an Object or give an Object to a Friendly adjacent model at any time during its Activation or as a Combat Action. The model will automatically drop the Object immediately prior to being removed if it is killed.
• A Beast model that picks an Object will drop it immediately after its move.
• When an Object is dropped for any reason, the owner of the model that was carrying it immediately places the Object adjacent to the model that dropped it.Stunned
Some in-game effects will result in a model becoming Stunned.
• While Stunned, a model has its Attack and Support stats reduced by one, including for Ranged Attacks.
• A Stunned model attacked by a Ranged Attack throws the usual number of Oran stones.
• While Stunned, a model does not recover Stamina during the End Phase.
• A model that is Stunned can recover the usual amount of Stamina via Inspire[T], Refuel[A], and Tune Up[A].
• The effect that causes the model to become Stunned will state at what point the effect ends. For example, a model may stop being Stunned upon leaving a certain area or after a specified time period.
• Multiple Stunned and Terror[T] effects do not stack their impact, even if from different sources. The durations are kept track of separately.Terror[T]
Some in-game effects will result in a model becoming subject to Terror[T] (terrified).
• While terrified, a model has its Attack and Support stats reduced by one, including for Ranged Attacks.
• A terrified model attacked by a Ranged Attack throws the usual number of Oran stones.
• While terrified, a model must also cast a successful stone before regaining Stamina.
• A model that is terrified can recover the usual amount of Stamina via Inspire[T], Refuel[A], and Tune Up[A].
• The effect that causes the model to become terrified will state at what point the effect ends. For example, a model may stop being terrified upon leaving a certain area or after a specified time period.
• Multiple Stunned and Terror[T] effects do not stack their impact, even if from different sources. The durations are kept track of separately.Vehicles and crew
A model with the Vehicle[T] (X) trait allows up to X Small models to ride it as Crew and gain a number of benefits (in addition to any models carried with Transport[A]). All models with Vehicle[T] are considered to be Vehicles and have the following special rules:
• models may be deployed mounted as crew on the Vehicle, or may climb aboard if they end their Activation adjacent to the Vehicle. When riding on the Vehicle the models are placed to the side of the playing area so they can be seen by both players.
• The crew are automatically selected for Activation with the Vehicle, unless they have already been activated that Turn. They may dismount as their Activation, place the model anywhere adjacent to the Vehicle either before or after the Vehicle has moved. If the Vehicle is destroyed or killed then the opposing player may place the crew as they like adjacent to, or within, the area previously occupied by the Vehicle.
• The crew gain a number of advantages while mounted:
◦ Crew count as adjacent to models that the Vehicle is adjacent to, but may not attack or Support in combat. Crew may still use Ranged Abilities and make Ranged Attacks even if the Vehicle is Engaged.
◦ Crew may not be attacked in combat, unless the attacking model has Agility[T] or Flying[T]. When fighting in combat the crew may cast one additional Oran defence stone.
◦ Line of Sight to or from the crew can be drawn over Small or Medium models within 1 inch of the Vehicle without any penalty. Additionally, crew always count as Obstructed if targeted by Ranged Attacks. -
Playing Scenarios
Open or CloseDescription
Twilight is a scenario based game, with small games that tell short stories about the world.
The scenarios use a few standard terms for deployment:Playing Areas:
Playing areas are typically assumed to be about 3 or 4 foot square, but most scenarios can be played on a smaller or larger area.
Groups:
Some scenarios refer to deploying models in groups. In these cases place one Elite or Troop model on the board, then place all other models in the group within its Command Range.
Terrain:
Players should lay the table out in a mutually agreeable manner.
-
Boats
Open or CloseBoarding and moving on Boats
Boats are treated as moving platforms and can generally hold as many models as can sensibly be placed onboard. However, only non-mounted models may board Boats - in most cases mounted models would not be able to board, although there may be special rules for larger vessels or special scenarios. Flying models may land on or fly over Boats. All normal rules for moving over and around Friendly or Enemy models apply while moving over Boats.
However, Boats can be dangerous to the unwary. While on a Boat, models that move within 1 inch of the edge of the Boat must take an Agility Test (2+) after moving. If they fail they are placed in the water at the closest point adjacent to the Boat. models Moving Cautiously do not need to take the test.
A model may board a Boat that is within 1 inch, making an Agility Test (2+) unless they Move Cautiously. If there are Enemy models blocking the way then those models must either move to give them space, or move to the edge of the Boat to block them. If they are blocked then the boarding model is placed in the water next to the Boat. A model may also jump over up to 2 inches of water to try and board a Boat by making an Agility Test (3+), falling in the water if they fail or if they are blocked by an Enemy model.Agility Tests (X+)
When a model needs to make an Agility Test (X+) they roll a D6. If they roll X or more then they succeed, otherwise they fail. When moving or boarding a Boat a failure results in the model falling overboard and being placed adjacent to the Boat.
models with Agility[T] or Surefooted[T] may reroll an Agility Tests.Clinging to a Boat
Any non-mounted model in the water next to a Boat may cling on and move with the Boat when it moves. models in the water may attack and be attacked as normal, but the defender (either on the Boat or in the water) casts one additional Oran. If the model on the Boat is removed in combat then the other model may immediately move to take its place, with other models moving to make space if necessary. If the model in the water suffers any blows then it is immediately moved 1 inch directly away from the edge of the Boat.
Steamboats
SteamBoats are commonly used by riverfolk across the Empire to pull trains of barges carrying goods for trade.
Movement:
Steamboats are not activated like other models. The Boat’s movement is dictated by the actions of the crew, but it is activated and moved at the end of each Combat Phase. When activated, the Boat moves in a straight line, 1 inch per point of Speed. Speed is normally shown by a small die placed in the prow.
Up to two models on the Boat may help control it. One Unengaged non-beast model standing by the engine may spend its activation to increase or decrease the Speed by one, up to the Maximum Speed of the Boat (typically 3). If an Unengaged non-Beast model is standing in the prow then the Boat may make one small turn before moving. A small turn is made by placing a Blast Template alongside the Boat, with the narrow end in line with the stern. Keeping a point on the stern fixed, the Boat may be turned as long as the near edge stays within the template.Towing:
The Boat may tow one or more barges. While attached, they are considered part of the Boat. When the Boat is turned the barges are not moved, but stay connected and will follow the Boat’s movement. Some scenarios may allow the barges to be separated.
Ramming/Crashing:
If the Boat contacts a Large or smaller model then the model is pushed out of the way. If the Boat was travelling at Speed 3 or more then the model must take a Toughness save.
If the Boat contacts a Huge model or a larger obstacle then it carries out a ram. Make an attack, casting 2 stones per point of speed. Any blows landed are Powerful (-1 save). Huge models that survive are pushed out of the way, but reduce the Boat’s speed by 1 point. If the Boat hits an obstacle that is not destroyed, for example the shore or another Boat, then it crashes and comes to a halt (set speed to zero). After a crash all models on the Boat(s) must make an Agility Test (X+), where X is the speed of the fastest Boat involved in the crash.Barges & Rafts
Barges and rafts are small, unpowered vessels that are either towed, or paddled along by their crew.
Movement:
Barges and rafts may be activated once per turn by any one model on board and may move up to 1 inch for each Small, or 2 inches for each Medium Unengaged non-Beast model standing next to the edge of the Boat that sacrifices its activation to assist with paddling. The barge may move a maximum of 6 inches. The barge may turn freely, with its movement measured based on the point on the barge that moves furthest.
Coracles
A coracle is a small one-fubarnii vessel.
Movement:
Only one Small non-mounted non-Beast model may board a coracle and once boarded they are treated as a single Medium-sized model that may paddle up to 4 inches across water in place of its normal movement.
The pilot may leave the coracle by Moving Cautiously.
The coracle may carry Small items and up to one Tiny model in addition to the pilot.
If a model clings to it, the coracle may only move up to 2 inches. It may not move at all if more than one model clings to it.
The coracle may be carried across land, either by one Small model Moving Cautiously, or at full speed by a larger model, or if a second Small model assists. -
FAQ & Clarifications
Open or CloseAbilities and difficult terrain
Any ability involving moving over ground is impacted by difficult terrain. As of this writing this includes Flit[C], Heavy[T], Momentum[S], Pounce[C], Prod[A], Sprint[A], and Very Heavy[T].
Activation
Unless specified in an ability’s description, it is possible to use several Activation Abilities during a model’s Activation Phase, in any order. For example, a Devanu Kopa with enough Stamina could move up to an opponent, Assassinate[A], then Sprint[A] and Leap[A] next to another one, and Assassinate[A] again.
Activating Wild Creatures
Wild Creatures do not share a common culture, and as such are all independent from each other (neither Friendly nor Allied). For example, although it has the Beast Handler[L] ability, a Skerrat Broodmother cannot activate a Grimblar.
Allies and Friends for Wild Creatures
As noted above, by default Wild Creatures are neither Friendly nor Allied. There are exceptions however:
• Creatures that have part of their name in common with a single-word creature are Friendly. For example: Tahela, Wild Tahela Jenta, Wild Tahela are Friendly. In contrast, the Tunnelling Akitiin and the Kellanion Akitiin aren't (they would be if a creature with the name ”Akitiin” existed).
• Creatures that have a Favoured Allies[T] relationship are Friendly.
• Creatures that have a Loyalty[T] relationship are Friendly.
Blast Attacks and Line of Sight
A model under a Blast Template can only be affected if the shooter has Line of Sight to it.
Casanii Erillai and Hadera Riders
The Erillai and Hadera Riders may use only one of: Charge[A], Transport[A] or the Throwing Spear abilities during their Activation.
Casanii Ferals
Most of the time the Ferals live and fight separately from the older Casanii. Although they will occasionally fight as Allies with the Casanii tribes, they will always act as a distinct group. As such, Casanii from the Core lists may never be declared as being part of the Ferals theme.
Combat and Initiative order
In order to determine the Initiative order, use the currently drawn Initiative Counters. The order the players fight in is set by the reverse order of their Counters.
Example:
A three players game has a draw of orange (the current combat), yellow, yellow, blue, yellow, green. The players will take turns in that order: yellow, blue, green, and repeat.
Favoured Allies[T]
A denizen that has Favoured Allies[T] with a specific creature is Allied with all of that creature's variations. So Tak Sirahn has Favoured Allies[T] with both the Yartain and the Yartain Pup; the Engu Veteran, Keeva, and the Riverfolk First Mate have Favoured Allies[T] with the Tahela, the Wild Tahela Jenta, and the Wild Tahela (whether they can activate them is another matter).
KalGush and Persistent Clouds
A disabled KalGush will Vent[A] every Turn once it gets to 3 Stamina, with Clouds stacking on top of each other as time goes by (each one having a separate 50% chance of disappearing at the beginning of each Turn).
Fubarnii models
For the purpose of the rules, a fubarnii model is any model that is part of the Casanii, Delgon, Dhogu, or Empire cultures.
Mercenaries
The Engu and Dhogu mercenaries are seen across the Empire, selling their services to the highest bidder, so you can field them (independently or as a pair) as Allies in any Casanii, Dhogu, Empire or Casanii force (they might be a little out of place with Devanu or Kedashi forces, but I wouldn’t completely rule it out…).
Sacrificing an Activation
Some rules allow a model to sacrifice its Activation (for example, the paddling rules for Boats). A model may sacrifice its Activation in order to perform the alternate action at any point during the player's turn, and does not need to be activated (for example by a captain) in order to do so.
Solo[T] and Initiative order
A model that uses Solo[T] may return one of their Initiative Counters to the pool. If only one of their Counters has been drawn so far, this will result in losing their position in the Initiative order. If more than one Counters have been drawn, a wise player will return one of the previously drawn Counters to avoid this.
Sprint[A]
A model may only use Sprint[A] after it has performed a Basic Movement, which may be done Moving Cautiously, or may be zero (stay in place). Sprint[A] can be used multiple times after this movement (provided enough Stamina is available). Sprint[A] may not be used in any other case, for example it cannot be used to disengage from combat.
What ”within” means
Within means ”less than”, not ”less than or equal”. For example, a Trader is in base contact with the ferocious Kellanion Akitiin, which can use its Lunge[C] ability to attack a creature within 3 inches of it. On its Turn the Trader disengages, moving back by 3 inches: it is now (just) out of range of the Kellanion Akitiin’s Lunge[C].
-
Odds & Sods
Open or CloseThe frugin (Experimental)
Mark an area of frugin plants by means of a Template (which can actually be a few inches across). models can Move Cautiously through the Template safely. However, if anybody moves at full rate or takes a Combat Action while within the Template then a Cloud may be released. For movement roll a dice after each 2 inches of movement. For combat roll one dice for the attacking model and all supporting models that are within the cloud once all models have declared but before the combat is fought. On a 5+ a 2 inches gas Cloud is released over the offending model with immediate effect as below. Note that a single combat with different sides supporting could result in several Cloud releases. A moving model may be able to move out of the Cloud that it caused, but if it fails its Toughness save (see below) then it immediately stops its movement.
The frugin releases gas Clouds similar to that of the Mounted Gushrak venting but considerably more noxious. I would suggest a Toughness save for any models within the Cloud when it is released, or that enter it at a later time. If failed then they have all their stats halved (round down) and cannot regain Stamina until they have left the Cloud. If they pass then they still have one less stone for Attack and Support and cannot regain Stamina while in the Cloud.
The additional growth for the frugin takes a lot longer than in game effects, but the additional nutrients seeping into the soil might prompt additional Cloud releases from dormant nodes near the core plants. If any models have failed a Toughness save while in the cloud then during the next End Phase cast 3 stones and place a 3 inches Template for each success. Positioning of these should be randomised, but there isn’t a standard approach to scatter for Twilight yet… Choose a random direction and place each Template so that its edge is D6 inches from the centre of the original Cloud.
(see the encyclopaedia for a description of what the frugin is. Original rules discussion in the forum.)